If you ever have problems trying to calibrate a Wixey WR700 Saw Digital Readout, then this is your place to find answers. And if I don’t answer your specific question, leave a comment below, or send me an Email .
This article was updated August 5, 2019.
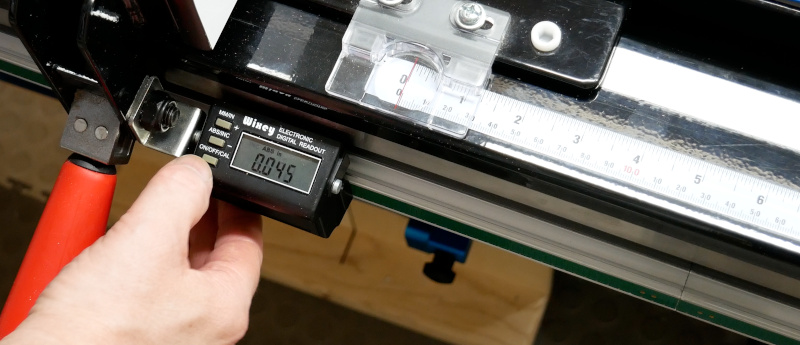
![]() Don’t forget that you should probably re-calibrate the gauge if you switch to a blade with a different thickness.
Don’t forget that you should probably re-calibrate the gauge if you switch to a blade with a different thickness.
About Imperial Decimal Places
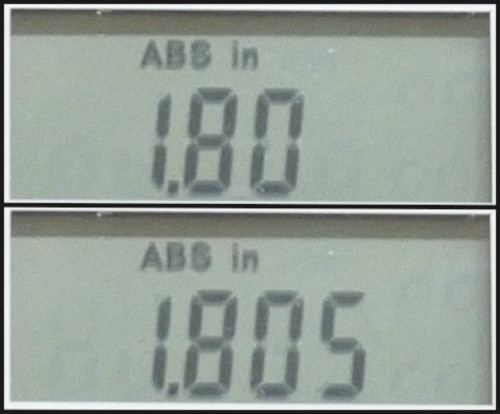 The Wixey gauge’s readout has two decimal places, or three if the value rounds to 5 thousands of an inch.
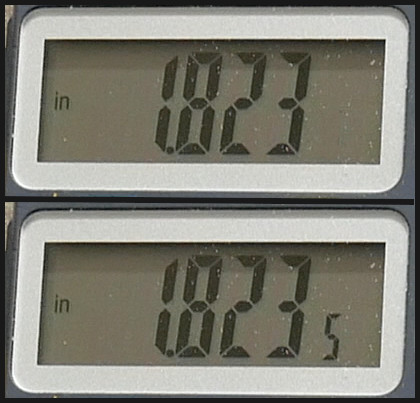 Compare that to my digital caliper, which has three decimal places, or four if the value rounds to 5 ten-thousands of an inch.
Those extra “5”s at the end of the numbers can be confusing. So, here’s two ways to handle them:
-
Ignore the “5”s. That’s a level of precision that’s probably irrelevant to woodworking.
–or–
-
If there isn’t one of those “5”s, pretend there’s an additional “0”. That’s what I’ll do in the rest of this article.
Typical Calibration Method
Calibrate
Watch this section of my video, if you don’t want to read.
Here’s the steps for calibrating the gauge.
-
Raise the blade.
-
Slide the fence over until it just “kisses” the blade, and lock it down. The blade should be able to spin, but just barely.
-
Press and hold the
ON/OFF/CALbutton for 3 seconds. This “zeroes the gauge”. -
Press the button again to store the value.
That’s all you have to do.
Verify
If you want to verify the calibration:
-
Cut a piece of scrap.
-
Measure the width of the cut piece, using a digital caliper.
-
Compare this number to the value on the Wixey readout. Remember the numbers are probably different resolutions, so don’t forget the information in the About Imperial Decimal Places section (above).
-
If the numbers are different enough that you care, follow the next steps.
Adjust
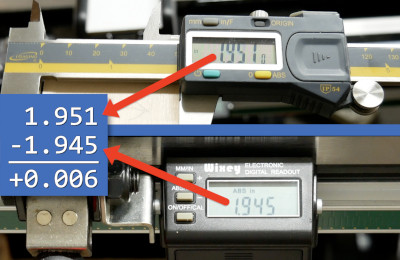
Subtract the value on the Wixey readout (bottom) from the value on the caliper (top).
Move the fence back until the gauge reads "0", and lock it down.
Press and hold the calibration button to start calibration again.

Use the "+" or "-" buttons, depending on the whether the value you got in step #1 was positive or negative, to add or subtract increments of .005" until you've made up as much of the difference as possible.
Press the button again to store the value.
Repeat the verification process if you want.
Comments
Now you can comment as a Guest!
You won't receive email notifications of my replies, though.
- Use any name.
- Use test@example.com for your email address.
- “Check” all the boxes. Since you’re using a fake email address, it doesn’t matter what you agree to. 😛
I’ll have to approve your comment, but as long as you’re not spamming me, that’s no problem. Just remember that I do sleep sometimes, or I might be in the workshop, so I might not approve it right away.